Turtles are one of my favourite sea-life animals. They are so adorable and I just love them. Not only do I collect turtle things but I love seeing turtle related food things.
If you read my last blog, you will realise that I just discovered how delicious peanut butter is in desserts. So to follow on with the theme of peanut butter, I decided to make these super cute Nutty Turtle Macarons.
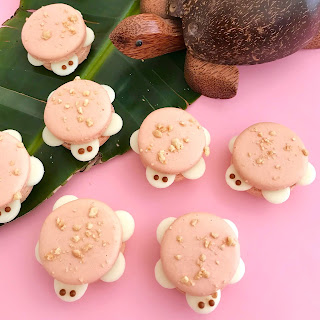
These turtle macarons are so fun to make. They have a delicious peanut butter filling in the centre and a sprinkle of crushed peanuts for the turtle shell. I used white chocolate buttons for the head and feet of the turtle. To create the turtle eyes I piped two dots using some coloured icing.
I was really happy with the way these turtle macarons turned out. They are almost too cute to eat.
Happy Baking xo
Nutty Turtle Macarons
Ingredients
· ¾ cups almond meal
· 1 cup icing sugar
· 2 egg whites
· 4 tablespoons caster sugar
· Food colouring (Warm Brown Americolor)
Peanut Butter Filling
· ½ cup icing sugar
· ¼ cup smooth peanut butter
· 30 grams unsalted butter
Icing
· ½ cup icing sugar
· 2-3 teaspoons water
Decorations
· 2-3 tablespoons Crushed peanuts (optional for sprinkling on macarons)
· White chocolate buttons (for turtle head & feet)
Instructions
1. Preheat oven to 130°C.
2. Line two baking trays with baking paper.
3. Sift almond meal and icing sugar together in a bowl.
4. Using an electric mixer, beat egg whites in a bowl until soft peaks form. Gradually add sugar, beating until dissolved. Add food colouring, beat until just combined.
5. Fold in half the almond mixture until just combined. Fold remaining mixture until the mixture is all combined and glossy (this may take a little bit of time). Remember to fold, not mix.
6. Spoon into a piping bag or a large snaplock bag. If using a snaplock bag, snip 1cm from a corner of the bag. Pipe round mixtures evenly onto the lined baking tray, allowing a bit of space between each piped macaron.
7. Sprinkle some crushed peanuts on the maracons shells.
8. Tap the trays on the bench to remove air bubbles. Set aside for 30 minutes to an hour, or until the tops of the macarons are dry and firm to touch.
9. Bake macarons one tray at a time for 18 to 20 minutes or until tops are firm. Cool on trays and carefully transfer to cooling rack.
10. Using the royal icing, pipe two dots on the white chocolate button for the turtle eyes.
11. Pipe a small amount of icing to the top of the macaron, then place the white chocolate button with the turtle eyes on. On the side of the macaron, pipe a small amount of icing and place four white chocolate buttons for the turtle feet.
12. Then pipe some peanut butter filling into the centre of half the macaron shells. Sandwich with the remaining macarons. Set aside until filling sets.
Peanut Butter Filling
Place the butter, icing sugar and peanut butter into a bowl and using an electric beater beat until mixture is light and fluffy. This will take about 5 minutes.
Royal Icing
Place the icing sugar into a bowl and add 1 teaspoon of water and mix. Keep adding 1 teaspoon at a time until mixture is at piping consistency. Add a drop of the food colouring and mix until combined. Place into a piping bag with a small nozzle.
Tips
· Make sure the mixing bowl is completely dry when beating the egg whites. If there is water in the bowl the egg whites will NOT form a peak.
· To get evenly spaced macarons on a tray you can buy a template or make your own. I made my own by using baking paper and drawing circles evenly spaced out. I placed the template under the baking paper and piped my macarons onto the image. Remove the template after so that you can use it again.
· For more even colour on the macarons, remember to turn the tray halfway in the bake.
Did you bake this recipe?
Remember to tag @youcanbakeittoo on Instagram & hashtag #youcanbakeittoo
so I can see your wonderful bakes.


Comments
Post a Comment