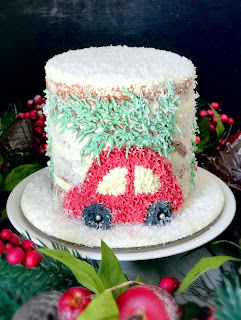
I was so excited to be taking part in this super fun Vintage Christmas Cake collaboration on Instagram hosted by the sweet and talented Staci @stacibakesalot Be sure to check out all the amazing bakes from everyone #vintagechristmascakecollab
When I think of Vintage Christmas, I always think of a cute red car with a Christmas tree on top.
This collaboration gave me the opportunity to create something I've never tried. I'm so happy with how the cake come together. Boy, was it challenging trying to create what I imagined and put it into cake form.
This cute Vintage Christmas Cake is made of a moist coconut cake with smooth Swiss meringue buttercream in between each layer. The design is piped using more delicious Swiss meringue buttercream and finally decorated with some sprinkles.
Happy Baking xo
Vintage Christmas Cake
Ingredients
· 2 cups self-raising flour
· 1 cup caster sugar
· ½ cup desiccated coconut
· ¾ cup almond meal
· 2 eggs
· 150 grams butter (melted)
· 250 ml buttermilk
· 1 teaspoon vanilla extract
Swiss Meringue Buttercream
· 2 egg whites
· 150 grams caster sugar
· 200 grams unsalted butter (room temperature)
· 1 teaspoon vanilla extract
· Food colouring (red, black – queenfinefoods warm brown, leaf green – americolor)
Decorations
· Desiccated coconut
· Sprinkles (glamour & sparkle – queenfinefoods)
Instructions
1. Preheat oven to 180°C.
2. Spray four round 4-inch tins with oil and dust some flour around the tins.
3. Mix the sifted flour, desiccated coconut, caster sugar and almond meal into a large bowl until all ingredients are well combined.
4. Add all wet ingredients, making sure the butter has cooled down. Mix until combined.
5. Spoon the mixture into the tins evenly. Make sure to only fill them up a third full and smooth the tops with the back of a spoon or off-set spatula.
6. Bake in oven for 30 - 35 minutes or until a skewer inserted into the cakes comes out clean. Remove from oven and cool in pans for 10 minutes before turning onto a wire rack to cool completely.
Swiss Meringue Buttercream
Place egg whites and caster sugar into a large bowl. Place over a pot of simmering water on low. Whisk until the sugar has dissolved completely. To check if the sugar has dissolved, rub a bit of the mixture between your fingers.
Remove from heat and using a stand mixer with the whisk attachment, beat on medium speed for about 10-15 minutes or until mixture has completed cooled.
Remove whisk attachment and replace with the paddle attachment. Slowly add portions of the room temperature butter and beat well before adding next portions.
Once all the butter has been added, beat on high for several minutes and then reduce to low speed and continue to beat for another few minutes to remove air bubbles.
Frosting is ready for use.
Assembling the cake
Cut-off the tops of the four cakes if needed to make them even.
Place one cake onto the cake board, securing it with a bit of buttercream at the bottom.
Pipe some buttercream around the top of the cake, spread it evenly and stack the next cake and do the same.
Lightly crumb coat the whole cake and place into the fridge for 15-20 minutes.
Create a thin final coat on the cake to achieve the semi-naked cake look and place cake in the fridge for at least 30 minutes.
Remove cake from the fridge and pipe the design of the car and trees. Add sprinkles to the trees on the side of the cake and finally, sprinkle some desiccated coconut on top of the cake, over the parts of the trees and car and also around the bottom of the cake to create snow.
Tips
· You can also line the bottoms of the tins with some baking paper.
· Allow cakes to cool completely before icing and decorating.
· I drew and cut out the shape of the car with baking paper and placed it onto the cake and with a toothpick, traced the outline before piping the design.
Did you bake this recipe?
Remember to tag @youcanbakeittoo on Instagram & hashtag #youcanbakeittoo
so I can see your wonderful bakes.


Comments
Post a Comment