I'm not sure about you but those Tasty videos on YouTube can be fun to watch and they make me want to make whatever they are baking because it looks so good.
One of those videos is the 2-Minute vs. 2-Hour vs. 2-Day Cookie. I decide to skip the 2-Minute cookie as it didn't look great but the 2-Hour and 2-Day Cookie sure looked delicious.
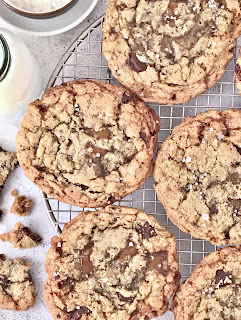
If you remember I made the 2-Hour Cookie a few months ago and finally, I got around to making the 2-Day Cookie.
It sure was hard to leave the cookie dough in the refrigerator for 2 days before baking them but I can say with confidence that it is worth the wait.
The flavours of these 2-Day Cookies were incredible. They were so delicious with chocolate chunks and homemade toffee throughout the cookies and the sprinkle of sea flakes added to the flavour. Allowing the cookie dough to rest in the refrigerator over 2 days helped develop and intensify the flavours.
I especially enjoyed the toffee pieces throughout the cookies as they were so soft and chewy even after the cookies were completely cooled.
Below is my very small changes to the recipe. Hopefully, you get around to making them too.
Happy Baking xo
Tasty’s 2-Day Cookie Ingredients Toffee · 170 grams unsalted butter
· ¾ cup brown sugar
· 1 teaspoon salt
· Water, as needed
Cookie Dough · 225 grams unsalted butter
· 4 ice cubes
· ¾ cup sugar
· 1½ cups brown sugar
· 2 teaspoons instant coffee powder
· 1 teaspoon salt
· ½ teaspoon baking soda
· 2 large eggs
· 2 teaspoons vanilla extract
· 2½ cups plain flour
· 180 grams dark chocolate
· Sea salt flakes, for sprinkling
Instructions Toffee 1. Line a tray with baking paper.
2. Place butter, brown sugar and salt in a medium non-stick saucepan over medium heat and stir until all ingredients are evenly incorporated. If the fats start to separate, add a couple of splashes of water and stir vigorously to emulsify. Continue cooking until the mixture reaches 143°C, about 10-15 minutes.
3. Pour the toffee over the lined tray and spread out slightly with a spatula. Freeze until ready to use, about 30 minutes.
Cookie Dough 4. Melt butter in a saucepan over medium-high heat until butter turns dark brown and smells nutty. Watch carefully so that the butter does not burn. Remove from heat.
5. Add one ice cube and let it melt slowly. It may froth and bubble. Add the remaining three ice cubes and stir until completely melted.
6. In a large bowl, combine sugar, brown sugar, instant coffee powder, salt and baking soda.
7. Pour the brown butter into the sugar mixture and mix until combined.
8. Add lightly beaten eggs and vanilla extract and mix until the mixture is glossy and smooth.
9. Add flour and fold until mixture has no visible flour streaks.
10. Remove toffee from the freezer and place into a zip-lock bag and break into chunks using a rolling pin.
11. Fold the crushed toffee and chopped chocolate into the dough until evenly distributed.
12. Using a large ice-cream scooper, scoop the dough and place onto a lined baking tray. Cover with cling wrap and place into the refrigerator for at least 48 hours. This allows the flavours to develop and the dough to dry out a little as it rests, which will result in less spread when baked.
13. When ready to bake. Preheat oven to 170°C.
14. Line trays with baking paper and place cookie dough onto the tray, remembering to leave at least 5cm between the cookies and away from the edge of the tray.
15. Bake in oven for 18-20 minutes or until the edges are golden brown but the centre is slightly soft.
16. Immediately sprinkle the cookies with sea salt flakes and allow the cookies to cool completely. They are very soft at first and will set after they cool completely.
Tips · These cookies spread when baked; so remember to leave room between each cookie on the tray.
· Best to use a non-stick saucepan to make the toffee as it’s easier to clean.
Did you bake this recipe?
Remember to tag @youcanbakeittoo on Instagram & hashtag #youcanbakeittoo
so I can see your wonderful bakes.


Ohh, these cookies look absolutely stunning, Karyn! I love the look of that homemade toffee and find the inclusion of the ice cubes in the cookie recipe so intriguing! I am not sure if I would be able to leave the dough for these alone in the fridge for two days! Thanks so much for the inspiration and hope you're well and safe.
ReplyDeleteThank you so kindly Katerina. The homemade toffee is amazing in these cookies. The 2 day wait is worth it. I have made another batch since posting this blog as everyone loved them. Hope you’re well too.
Delete